
Newsletter 52 - September 2015

Ornamental plants
- Continue to deadhead flowers to keep displays going as long as possible.
- This month is your last chance to take cuttings from tender plants.
- Collect seeds from your perennials and annuals to sow next year or swap with friends.
- Cut down the flowered stems of spent perennials.
- If there are dull spots in the garden, plant late summer flowering perennials such as heleniums, helianthus or asters.
- Fill in gaps in your displays with autumn-flowering bulbs and bedding (such as nerines and gentians).
- Start to plant out your spring bedding, including violas and wallflowers.
- Small evergreen shrubs, conifers and trees can be moved over the autumn.
- Plant hyacinth bulbs by the middle of the month to have Christmas flowers.
- Sow lettuces, spring cabbages, winter spinach, cauliflowers, Chinese cabbages, pak choi, hardy spring onions and rocket.
- Plant hardy onion sets for early summer crops.
- Sow winter greens for spring crops, such as land cress, mustard spinach, corn salad and hardy lettuces.
- Sow green manure (eg forage rye) in empty beds to suppress weeds and provide nutrients when dug back in in the spring.
- This month you should be able to harvest autumn raspberries, blackberries, early apples, Conference pears, sweetcorn, marrows, courgettes, beans, lettuces, rocket, spring onions, Chinese leaves, oriental radishes, autumn cauliflowers, cabbages, pencil leeks, maincrop potatoes, onions, shallots, garlic and globe artichokes.
- Prune out fruited canes from blackberries and loganberries.
- Keep an eye on the night time temperatures and cover crops to protect them from the cold.
- Pot up or dry herbs for use over the winter.
- Start to bring tender plants under cover this month as overnight temperatures start to dip.
- Clean any shading paint off your greenhouse now to let more light in.
- Raise the height of your mowing cut and start to mow less frequently as grass growth slows.
- Last chance to trim hedges before the winter.
- Cover ponds with netting to stop leaves falling into them.
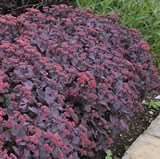
Sedum telephium (Atropurpureum Group) 'Xenox' is a herbaceous perennial which forms clumps of succulent leaves. The leaves are green/blue in spring and gradually darken to deep purple. In late summer and autumn rose pink flowers appear which also darken and provide attractive seedheads for winter interest. It likes a sunny spot and is drought tolerant. Find out more...

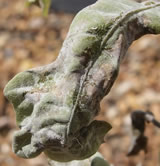
Oak powdery mildew is a fungal infection affecting oaks and, occasionally, beeches and sweet chestnuts. It causes a white, powdery coating to appear on leaves and shoots, which can cause them to blacken and shrivel. Mature trees are not severely affected but younger plants can suffer more acutely from stunted growth. Find out more...
World's largest orchid flowers at Kew
The 'Queen of the Orchids', Grammatophyllum speciosum, has flowered at the Kew Royal Botanic Gardens for the first time. The specimen was collected 32 years ago from Sabah, Malaysia. The flower spike is growing 1.5cm a day and is expected to reach 3m. The yellow flowers should last for 5 to 6 weeks.
Green Flag awards voting opens
Voting for this year's Green Flag Awards, presented to the UK's favourite park or green space, opened on the 1st September and continues until the end of the month. Victoria Park in the London Borough of Tower Hamlets won last year's award from the 35,000 votes cast.
700 year old oak damaged by BBQ fire
A disposable barbecue has almost destroyed a 700 year old oak tree in Richmond Park. Fire officers and a tree surgeon took 4 hours to cut out the burning wood and save the tree. This is the third time this year that fire officers have been called out to deal with barbecue fires in the park, despite them being banned in all Royal Parks.
Planting bulbs
It’s the time of year when garden centres are full of enticing bulbs for spring colour. But what happens when you get the bulbs home? While you can usually get away with the ‘dig a hole and pop it in’ approach to bulb planting, a little more consideration will give you better results and help the bulbs thrive year after year.
There are 3 steps for good bulb (or in some cases corm or tuber) planting:
Bulbs, like any other plants, need to be planted in the optimum soil conditions. So prepare the ground by improving the soil with organic matter such as garden compost and, if drainage is poor, dig in some grit.
If you’re planting your bulbs in pots make sure you pick a container which is deep enough and wide enough for the final size of the flowers (particularly if growing tall plants such as lilies) and has drainage holes at the bottom. If the pot is fairly large, add a layer of gravel or similar drainage material into the bottom of the pot. If you’re intending to replace the display each year (or at least remove the bulbs for replanting the next season) then you can use a mix of 75% multi-purpose compost and 25% grit or perlite. If you’re intending to keep the bulbs in the pot for more than a year, replace the multi-purpose compost with a loam-based compost such as John Innes No.2.
If you’re buying new bulbs then plant them as soon as possible.
Check the bulb over before planting it and discard any which are damaged, shrivelled, soft or showing signs of rot.
Dig a hole with a trowel or use a specialist bulb planter (if you have lots of bulbs then the long handled planters you push in with your foot are easier than the shorter ones). The hole should be as wide as your bulb is.
The depth to plant bulbs can be rather confusing, though most packets will include planting depths (so don’t bin them before you’re finished!). Here’s a rough guide to how deep common spring bulbs should be planted:
- Allium (most varieties) – 10 to 15cm deep (4 to 6 inches)
- Crocus – 8 to 12 cm deep (3 to 5 inches)
- Cyclamen – just below soil level
- Daffodils (large varieties) (Narcissus) – 20cm deep (8 inches)
- Daffodils (smaller varieties) (Narcissus) – 15cm deep (6 inches)
- Fritillaria meleagris – 8cm deep (3 inches)
- Hyacinths (Hyacinthus) – 12 to 15cm deep (5 to 6 inches)
- Muscari – 10cm deep (4 inches)
- Tulips (most varieties) (Tuplia) – 15cm deep (6 inches)
Put the bulb in the hole with its nose (the pointy end) upwards, if you can’t tell which end is the nose then plant the bulb on its side, it will turn itself the right way round. Space the bulbs at least double the bulb’s width apart. In pots they can be planted closer, just one bulb’s width apart.
Replace the soil on top of the bulb, breaking up large clumps and gently pushing it down so it doesn’t leave gaps around the bulb. Don’t press too hard or you could damage the growing tip.
If you’re planting in a container then fill the container to the depth you need the bulbs to sit at, put the bulbs in, then top up the soil. Cover the top of the container with chicken wire to prevent squirrels, mice or cats digging in it; this can then be removed when the shoots appear.
Water bulbs in containers regularly in the weeks leading up to them flowering (ie when they are actively growing) and after flowering until the foliage has died down. If you’re leaving the bulbs in the pot while they’re dormant you can reduce the watering, but just make sure the soil doesn’t dry out completely.
Regularly feed the bulbs while they’re growing using a multi-purpose fertiliser like Growmore on beds and a liquid feed (tomato feed is ideal) in pots. Keep on feeding them after flowering until the foliage dies down.
Deadhead spent flowers regularly, but don’t cut down the foliage, leave it to die back naturally – the bulbs need this to continue photosynthesising and build up energy for next year’s flowers.
More information on planting bulbs. We also have tips for propagating bulbs and forcing bulbs for Christmas flowers.
What's on this month
See out the end of the summer with these garden events:
- 5th September - Bee And Pollination Festival, University of Bristol Botanic Garden, Stoke Bishop, Bristol.
- 5th & 6th September - Orchid Festival, National Botanic Garden of Wales, Llanarthne, Carmarthenshire.
- 8th to 13th September - RHS Wisley Flower Show, RHS Garden Wisley, Woking, Surrey.
- 12th & 13th September - Tender Perennials in the Spotlight with Patio Plants, RHS Garden Rosemoor, Torrington, Devon.
- 13th September - Flower Power Fair, Sutton Park, Sutton on the Forest, North Yorkshire.
- 13th September - Kitchen Garden Open Day, Chiswick House & Gardens Trust, Chiswick, London.
- 13th September - Plant, Craft And Wildlife Fair, World Garden, Lullingstone Castle, Eynsford, Kent.
- 18th to 20th September - Harrogate Autumn Flower Show, Great Yorkshire Showground, Harrogate, North Yorkshire.
- 19th September - City Harvest Festival, Capel Manor Gardens, Enfield, Middlesex.
- 19th & 20th September - Annual Bulb Fair, Greenbank Garden, Glasgow.
- 25th September - Tropical Foliage, A Garden Tour And Talk, Overbeck's, Salcombe, Devon.
- 26th & 27th September - Malvern Autumn Show, Malvern Showground, Worcestershire.
- 26th & 27th September - Parham Harvest Fair, Parham House and Gardens, Pulborough, West Sussex.
- 27th September - Cyclamen Show, The Birmingham Botanical Gardens, Edgbaston, Birmingham.